Jan 28
ErinTop of my head life, vehicle
In homage to the “In Russia, the … you” meme.
In a very irritating turn of event, a pedestrian actually hit our car in JP Rizal street in Makati city. The man (whom I suppose is slightly drunk) broke two cardinal and basic rules of crossing the road:
- Look out for incoming cars, and
- Look at both sides of the road .
We were already traveling at around 40kph since there was no car ahead of us when I suddenly saw a man suddenly darted from the other side of the street to cross to our side. In a split second I saw that his face was glued to the other side and didnt even took a peek at our direction. The distance between him and our car was less than 20 meters so I started slamming the breaks and blaring the horn (mind you the horn of the Toyota Avanza is very loud). I also tried to slowly turn the car to the right side of the road but I was fearful that there would be speeding motorcyles so I couldn’t pull to the side quickly. It was a slow-motion sort of experience where I saw in my peripheral vision the man’s right cheek hitting the window behind me a split second before his body bounced off the middle door and as I was just able to bring the vehicle to a full stop.
I immediately opened the door and saw the man was standing up. His companions already rushed to help and check him out. I am thankful he wasn’t seriously hurt but I would imagine that come tomorrow he will have some bruises on his face and body when the anesthetic properties of alcohol wears off. It took the man a while to slur out “Nakita mo naman akong tumatawid..” (“You already saw me crossing the street…“) to which I irritatedly replied “Oo Manong pero ang lapit at ang bilis ko na. Di ka man lang tumitingin sa mga parating na sasakyan! Mag-ingat ka naman sa pagtawid!” (“Yes but I was already too near and travelling at high speed. You didn’t even check out the incoming cars! [Please] Exercise caution when crossing the street!“). The man’s companions let us go when they were assured that the man wasn’t permanently hurt.
I know that when it comes to accidents like that it will always be the driver of the incoming vehicle who is at fault. Even if the pedestrian is too stupid for their own good to obey basic rules for crossing the street, I still have a responsibility as I was manning a vehicle. I always keep watch of the right side of the road but I didn’t expect a pedestrian to slam me from the other side especially as I was in the outer lane of a 4-lane road.
The experience was my first vehicle accident (not counting this) and strengthened both my dislike for driving, my respect and fear for the deadly nature of a moving vehicle, and that you can’t really avoid an accident. It is too easy to snuff a life when you have at least half-a-ton of moving metal at your disposal. Especially in places wherein pedestrians lack the basic common sense to know basic road safety rules.
In homage to the “In Russia, …” meme: be extra careful when driving in the city because in Manila, the pedestrians accident you.
ciao!
Jan 28
ErinNon-FLOSS, Technology, Tipjar Tipjar, windows

[Advanced Disclaimer: Use the information in this posting at your risk]
If you want to minimize the amount of electricity used by your computer but dislike shutting down your computer because of the amount of time it need to start it up and open your applications, there is a compromise to be had if your operating system is configured properly to hibernate.
Hibernating an operating system means that all the information in the system memory (RAM to be precise) is written down as a “snapshot image” to the hard disk. The PC hardware is then turned off since the hard disk will not lose its information when powered down. When the machine is turned back on, the booting process of the operating system will look for a store snapshot image and load it back into the system memory. If this is successful, you will have your desktop at the same state as when it was hibernated. The time it needs to resume a hibernated image is relatively small compared to when booting the operating system from scratch (or what is called a cold boot).
All modern operating systems have support for hibernation but not all are enabled by default. To following steps will enable this feature in Windows XP:
- Go to Start->Control Panel->Power Options.
- Go to the “Hibernate” tab and ensure that the “Enable hibernation” check box is ticked. Click OK to dismiss the dialog and apply the change.
WARNING: This will reserve space on the system drive equal to the amount of RAM in your computer. If you have 2GB of RAM, 2GB of hard disk space will be set aside for hibernation.
- To hibernate, shutdown the machine but select the hibernate option. The machine will be turned off automatically (if this is properly configured).
- To resume the hibernated image, turn on the machine. The image will be invalidated after a successful resume.
NOTES:
– Some applications, usually those that have time-bound login sessions, do not like being hibernated.
– The space set aside for the hibernation support is different with the space allocated for the virtual memory.
– If the machine fails to resume or hangs while in the process of resuming, reboot the machine and boot into safe mode (Press F8 after the BIOS screens). Reboot the machine to invalidate the hibernate images and the machine should boot normally after.
Jan 28
ErinNon-FLOSS, Technology, Tipjar
MS Office provides a helpful function in ensuring that style consistency is easily done on the documents being created. The function is called the “Format Painter” which is part of the Standard toolbar.
If the icon is not visible (if not previously used) it can be added from the toolbar dropdown which is located at the end of the toolbar section.
How to use the Format painter:
- Highlight the text (or cells in spreadsheets) containing the style that you want to copy.
- Click on the “Format Painter” icon to copy the style into the painter memory.
- Highlight the text (or cell) that you want to have the same format.
Format Painter loses its “memory” after every cycle so repeat steps 1-3 as you see fit. Styles can also be used in Word documents to facilitate the document formatting process.
Jan 26
ErinNon-FLOSS, Technology, Tipjar Tipjar, windows, zip
Zip integration was introduced starting Windows XP which enables the Windows Explorer to treat zip archives as a normal directory. This allows users to visit the content structure of the archive without depending on an external application like Winzip or extracting the content.
The downside of this integration is that Windows Explorer needs to finish reading all of the zip archives in the directory being visited before the directory contents are listed. This can cause a significant performance slowdown if there are many or huge zip files in the directory.
To disable the zip integration, the following command can be invoked (requires admin privileges):
regsvr32 /u zipfldr
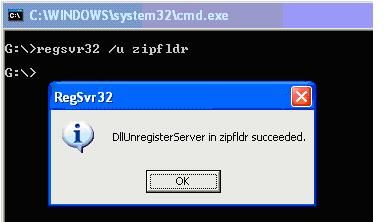
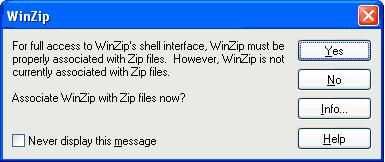
The command above will clear all zip file associations. If you have Winzip installed, launch a new instance and Winzip will prompt if you want to restore the association. Select the ‘Yes‘ option otherwise zip archives will not be handled properly when double-clicked from Windows Explorer.
If another archiver utility is used, look around the preference page for the association options if the prompt doesnt show at the startup of the the utility.
NOTES:
- If Winzip was configured to not show the prompt above, the associations can be done from the Tools->Configuration->System menu.
- If you are using a different application for handling archives (e.g. WinRar, 7zip, etc.), explore it’s configuration window or refer to the manual.
-
- The command “regsvr32 zipfldr” will restore the zip integration of Windows Explorer.
-
- BONUS: Dump Winzip and switch to 7zip. It supports more archive types, achieves significantly better compression, and best of all it is Open Source and free!
Jan 26
ErinNon-FLOSS, Technology, Tipjar Tipjar, windows
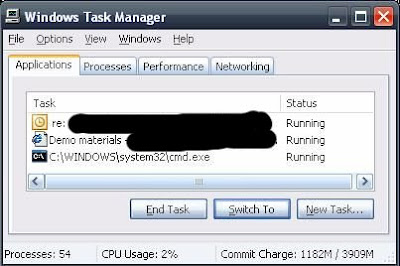
Windows Explorer suddenly died and you are left with a bunch of application windows open. Before you perform a hard reboot by flicking off the switch, here are a few tips to enable the system to cleanly recover or reboot. These are all assuming that the system is still responsive.
Restart Windows Explorer
The Windows taskbar is actually handled by an instance of Windows Explorer. To launch a new instance, the following may be done:
- Press “Alt+Tab” to cycle to an open command terminal. Execute the command “explorer” from there.
- Press “Ctrl+Alt+Delete” and press the “Task Manager” button to launch the task manager. Navigate to the Applications tab and use the “New Task…” button to execute the “explorer” command.
If the mouse is also not responsive, you can use the “Tab” button to navigate the controls in the dialog windows.
Restart Windows
If the new Windows Explorer instance also refuses to function, a soft boot of the operating system would be in order. Since the “Start->Logoff” menu will also be inaccessible, try using the shutdown command to restart the machine.
- Press “Alt+Tab” to cycle to an open command terminal. Execute the command “shutdown -r” from there.
- Press “Ctrl+Alt+Delete” and press the “Task Manager” button to launch the task manager. Navigate to the Applications tab and use the “New Task…” button to execute the “shutdown -r” command.
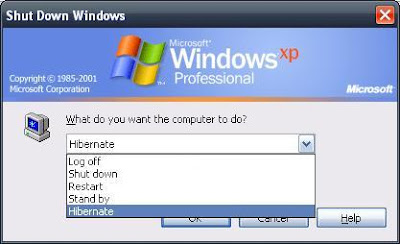
The shutdown command also has a graphical interface if you prefer to use a Window to shutdown a window. Invoke the command “shutdown –i” to launch the GUI.

If all else fails
A hard boot is the only remaining option. Try pressing and holding the power-off button for a few seconds to invoke the motherboard’s power-down feature. If this still doesn’t work then go for the last resort of pulling the plug.
Jan 05
ErinNon-FLOSS, Technology, Tipjar Tipjar, windows
If you need to free storage space in your C:\ drive, here are the following files that are *relatively* safe to remove. See notes and disclaimer below.
- Log files placed in log directories. Consult the application manual or your friendly neighborhood techie if you are in doubt.
- Files with the “BAK” or “BACK” extensions. These are usually temporary files created by applications performing actions that physically alter the files. Evaluate if you still need the backup prior to removal.
- Files with names starting with the tilde (~) symbol. These are temporarily files created by some applications (notably MS Office) that it failed to remove after the file was closed.
- Zip files created to send whole directories via email. These should ideally be deleted after sending but for some reason they were left there. 🙂
- [May require elevated privileges] Contents of the “%SYSTEMROOT%\Temp” directory. Delete as much of the files you can but there will be some file not available for removal as they are currently in use.
- Contents of the “%USERPROFILE%\Local Settings\Temp” directory. Delete as much of the files as you can but there will be some not available for removal as they are currently in use.
- [May require elevated privileges] Directories in “%SYSTEMROOT%” that follows the format “[identifier]$”. These are information required to uninstall Official Windows patches.
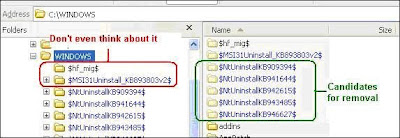
- DO NOT REMOVE directories that do not follow the format above.
Notes and Mandatory Disclaimer:
- As this tip deals with deleting of files, the information is intended for educational purposes only. Please think twice about permanently removing files (shift+delete, removing from the recycle bin). Use the information above at your own risk.
- To know where your %SYSTEMROOT% and %USERPROFILE% directories are, execute the command echo “%SYSTEMROOT%” and echo “%USERPROFILE%” in a command window.
- When removing uninstall information for Windows patches, consider leaving behind folders with “Date Modified” values of at most one month prior to the current date. The probability of uninstalling patches installed at older dates becomes small if the machine is in constant use.
- Some files may require elevated privileges that are not granted to normal users. If this is the case and you need to free up space, seek assistance from your workstation administrator.
Jan 05
ErinTop of my head administration, Linux, ubuntu
sudo dpkg-reconfigure tzdata
Then navigate to your timezone. Handy for Ubuntu systems without XServer.
 RSS
RSS