 RSS
RSSUsing SMART BRO (USB Internet) Plug-it in Linux
Nov 05
FLOSS, Gadget, Technology floss, guide, hardware, internet, Linux 8 Comments
This guide is created to show how to use the SmartBro USB Internet dongle in Ubuntu Linux. The dongle comes with the Windows installer that enables the SmartBro application to be installed in most computers. From within that application the user is able to send and reeive SMS, and connect/disconnect their Internet subscription. It allows more operations like access to the Smart portal but for the duration of this guide only the SMS send/receive and Internet configuration is covered. The instructions should be portable to the plug-it kits of the other telcos.
From my experience, Ubuntu has easily supported the USB dongles and tethering devices as early as Karmic Koala. I no longer have my Sony Ericsson K618i that I just connect via a USB cable to my MSI Wind U100 Netbook so this is what I will use for the guide. My netbook is sporting Natty Narwhal during the time the screenshots are taken.

Lets get cracking. Caveat though that I had to recreate some activities in two different locations so don’t mind the clock too much.
Configuring data connectivity
- Boot into Ubuntu and connect the dongle. Wait for a few second while the system recognizes the device.
- From the system tray, click on the network-manager applet and enable the “Enable Mobile Broadband” option. Select the “Edit Connections…” entry, and add a new entry under the “Mobile Broadband” tab.
- As can be seen below, Ubuntu has already detected the chipset of the USB dongle. Click on the Forward button.
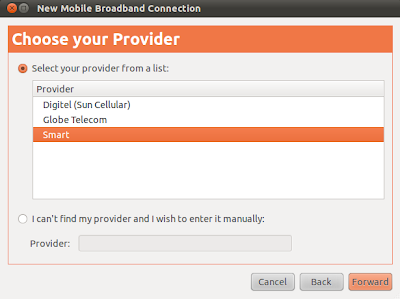
- Select the provider (which in this case is Smart). Click on the Forward button.
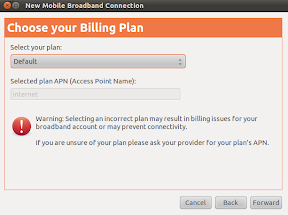
- On the billing plan dialog, accept the default selection and click on the Forward button.
- Confirm the summary of the selected settings by clicking the Apply button.
- Visit back the settings of the created connection and ensure that there is no username and password in the Mobile Broadband settings page. Save any changes made and dismiss the wizard to go back to the desktop.
- Click on the network-manager applet and click on the mobile internet entry created above.
- If everything goes well and the signal is strong enough the user should be greeted with an established connection message.
- Click on the network-manager to validate the type of connection.


Configuring SMS capability
The setup above can fail if the SIM card used is of the prepaid type and there is no credit loaded on the account. SMART imposes a Php10/30mins rate but there are promos that can be activated by sending some keywords via the SIM account. This implies that the SMS send and received facility should be accessed. Fortunately the wammu project provides this capability.
- Install the wammu application by invoking the command below:
- Start the wammu application. If the wammu application doesn’t find its configuration files then it will trigger a wizard for first time-configuration.
- Click on the Next button to start the Wizard and select the following options in the succeeding windows:
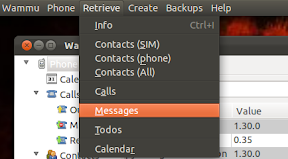
- Once the wammu phone configuration is done, start accessing the USB dongle by invoking the Phone->Connect menu item.
- Once the dongle is active, test the connectivity by receiving existing messages.
- After the operation succesfully completes, select the Messages item in the left treebox to view all retrieved messages.
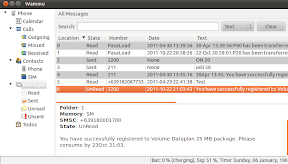
- Next is to try the SMS sending capability under the Create menu. The editor is dated compared to the built-in provider interface but it would suffice. In the screenshot below, the bucket promo of Always On is being triggered.
- Check the Sent folder if the message was successfully sent.
- After a few seconds/minutes, retrieve the messages again to check the result of the promo registration.
sudo apt-get update && sudo apt-get install wammu -y

– Configuration Style: Guided Configuration
– Configuration type: USB Cable (as the unit is plugged in a USB port)
– Phone Type: None of the above (unless future versions provide an option for the chipset)

– Connection Type: AT based
– Driver to use: Generic AT over serial line or it’s emulation
– Phone device: /dev/ttyUSB0

The above part is trial and error. If the test doesn’t succeed select the next option. If it succeeds then information about the model of the dongle will be shown. In my experience it is almost always /dev/ttyUSB0 but then I do have another device that emulates a serial connection via USB.
– Complete the remainder of the next dialog windows using the default option.


And that is basically it. The instruction in this guide, with minor tweaks, should be applicable to any of the USB dongle. Enjoy your USB Internet dongle in Linux. 🙂
ciao!
Nov 25, 2011 @ 10:35:28
Ubuntu Linux is interesting to use. Perhaps you can also post about how to set up Smart bro Canopy wireless broadband in Linux.
Nov 25, 2011 @ 22:02:40
Actually that should be seamless as the terminating modem should appear as a normal network conduit to any operating system once it is activated. Your operating system’s dhcp client should be able to request for an IP address once you plug your computer to it.
Thanks for dropping by.
ciao!
Mar 04, 2012 @ 09:11:17
Have you tried to connect to it through wammu at the same time as it is busy serving as a mobile broadband connection? Does that work?
Mar 04, 2012 @ 13:41:47
@Vidar: No I haven’t as I didnt have a need to do that. I only use the SIM for mobile internet and less and less these days after I got my Galaxy S2.
With that said, I don’t see why that wouldn’t work. Theoretically pushing voice and data at the same time should also work.
My USB dongle is currently on loan to an office mate, but I’ll give that a try when I get it back and post it here. 🙂
ciao!
Mar 16, 2014 @ 19:39:07
Hi, I bumped on to your site while I was googling about some workaround on how to turn a Chromebook to a full fledged laptop. I am planning to install Ubuntu to an Acer C720 Chromebook that I will be receiving in a few weeks. So far, I am getting a good feedback from my “googling”, but there is one thing more that I want to make sure of;
Would I be able to install Smart LTE plug-it within Ubuntu?
Many Thanks!
Mar 24, 2014 @ 22:42:42
@Nero: I dont have an LTE stick but I dont see why it wont be supported. The difference between the 3G and LTE sticks are mostly on the radio transmitters. To the Linux kernel they will most likely be viewed as a modem. The key is finding out if the LTE stick you want to purchase/acquire has good support. I have seen a few guides already that details how to get LTE stick support but mostly those are Huawei sticks.
ciao!
Jun 16, 2015 @ 20:57:22
Using your guide, I had no problem setting up my ZTE MF180 HSDPA USB stick (with SmartBro) to work on my mobile broadband in Ubuntu 14.04. A big thank you for your guide.
I am however having a problem getting wammu to work so that I can send and receive SMS via the USB stick. All goes well with the set-up wizard up until the Phone Device window. No device is listed in the drop-down box, so I manually enter /dev/ttyUSB0 and click on Next. This brings up the Connection Test window with the error message “Error opening device, You don’t have permissions for /dev/ttyUSB0 device! Maybe you need to be a member of dialout group.”
I have tried Connection Type “AT based” and “OBEX and IrMC protocols”. Both produce the same result.
Any further guidance would be appreciated.
Jun 16, 2015 @ 23:17:04
Glad to have helped. Wammu was working automatically on my then USB stick but I dont have it anymore and have long switched to mobile wifi access point devices. In your case, you may want to start with the most simple solution as described in the error message which is to ensure that /dev/ttyUSB0 exists and that you have permission to it. A simple “ls -l /dev/ttyUSB*” should validate the first, and then if it exists then check if its really owned by the dialout group and if adding yourself on that group is enough (i.e. sudo usermod -aG dialout `whoami`).
ciao!