No time to read through contexts? Jump to the TL;DR; section.
There are use cases that require the secure wiping or deletion of files. There are already a lot of available utilities available in most modern distributions such as srm, swipe, etc. These however entail installing an additional package which is fine for work machines. The use case I had is to securely delete a transient file after it was generated and used in a Continuous Integration server. Installing the secure-delete package is trivial but a base Linux system already has the tool that can do the job: dd
If the Linux VM was running at the time the host OS (Windows) hibernated then the clock in the guest VM will be left at the time of hibernation. If NTP is configured then the clock should resync gradually but most systems do not apply a big chunk of time correction by default.
If the Linux VM was configured with a VPN that implements a system-wide configuration then the DNS resolution might be unable to resolve the NTP server since the DNS of the VPN session will be unavailable. The alternate and work-around presented hinges on two things:
The guest VM has internet access at the time it was resumed.
The google.com domain name is already resolved and cached.
   sync-clock() {
     echo Current time before sync: `date`
     echo Current time after sync : `sudo date -s "$(wget -qSO- --max-redirect=0 google.com 2>&1 \
       | grep Date: | cut -d' ' -f5-8)Z"`
    }
The work-around uses the time in the google headers to provide an anchor for the correction. This is provided as a bash function to provide user feedback if a correction was done.
The GNOME control center in my Manjaro system crashed while I was tweaking the details of the mouse settings. After it crashed, I was unable to bring it up again even after a reboot.
The solution was to reset the configuration files for it using the following command:
$ dconf reset -f /org/gnome/control-center/
After that, the control center UI is up and running again. Based on the search hits, visiting the details pane can sometimes caused the state that results to a segmentation fault whenever the control center initializes.
Last weekend I reinstalled my Linux system (and not because I want to rename it as Pyg!) which is a very bad decision as it is the same time that my pitiful internet connection fails to transmit any data beyond a few bytes. The new install to Ubuntu 15.04 (Vivid Verve) gave me the confidence to start using btrfs which is being touted as the next generation file system for linux systems. Bad move and very short-sighted on my part. 🙁
The btrfs is supposed to provide enhancements to ext4 file system since it (btrfs) is built from the ground up but with the useful features already present in ext4. The ext4 filesystem is basically being viewed as an aging hack on a hack since it builds on ext3 which is a tack-on improvement for ext2. Btrfs might be delivering on some of its promised features but those who use it should still be wary of it as it is still not considered as ready for “production” or real-world use[1]. I wish I knew this before I chose it as the filesystem for my home directory. 🙁
For those that will have the misfortune of encountering it, the gist of my predicament follows (which is based on how I remember it):
I upgraded my system using dist-upgrade.
I encountered a severe freeze which left me with no choice but to reach for the power button.
System bootup hangs. The last entry goes something like this:
A start job is running for /home… (10s /no limit)
Eventually the bootup hangs and it drops the control to an emergency shell.
It was unnerving for me since a reinstall means I would need to re-download the upgrade packages on my #@$@#$ Smart LTE connection. The light-bulb moment for me was that /home is the only partition in the sequence that is using btrfs. The working theory is something borked during the forced shutdown which should have been handled by the journalling features. Thanks to an alternate albeit slow alternative connection, I was able to google enough to do the following:
Boot the machine and press F12 after the BIOS/UEFI prompt.
Selected the menu option for Ubuntu Advance options.
Selected the option for “(recovery)”
Selected the “drop to root shell” option.
Remounted the root system in r/w mode. I dont think this is needed but this is what I have done and it won’t hurt anyhow.
# mount -o remount,rw /
Did a btrfs file system check on the home partition
# btrfsck /dev/sda4
When nothing popped out, I went for the repair option.
# btrfsck --repair /dev/sda4
The repair option is always accompanied by a cautionary warning as it can delete information so having a proper backup is recommended. In my situation that is like adding salt to the injury. When I ran the repair option it reported that the cache and super generation areas do not match and that it cleared the space cache. After doing so I ran another btrfsck on the partition and rebooted the system which thankfully landed me on a working system with no (identified) data loss.
The moral of the story is to select btrfs only for the filesystems that you can afford to lose data; or have a good backup scheme. Using it for /tmp is going to be an overkill but to each to his own. Now Im thinking if I want to convert my home partition back to ext4. 😀
For the impatient, jump to the end of this post for the summary of the commands to be invoked. 😉
I have signed up again for a Coursera course for Interactive Python programming to improve my Python programming skills. I am going to sidestep the question if I am going to finish this course for the moment. 😉
The course professors have developed and are using CodeSkulptor to make it easier to create, submit, and grade the course. CodeSkulptor is basically a browser-based Python interpreter that implements a subset of Python 2.x. It absolves the students enrolled in the course from the requirement to install Python in their local machines plus it also allows them to continue working on their code while on different machines (provided they know their work’s randomly generated URL).
The abstraction provided by CodeSkulptor however renders some incompatibilities in running the code locally. This could be a disadvantage for people who wants to work offline, either by choice or by location. Coursera member Jimmy Delgado has provided good quick tutorial on how to run CodeSkulptor code locally. The post is in the Coursera forums but I am replicating it here and then augment it with the steps I have added to make it run on my Ubuntu 14.04 installation.
The SOA server I am currently working with had a nasty quirk on its services that I havent figured out yet on how to fix: it fails on requests with an XML comment. We use SOAPUI to trigger requests and the quirk requires most of us to strip the comments that is automatically generated by the tool. This quirk however gives me a good segue on this IT tipjar: how to leverage pattern matching to batch remove comments. This should serve as an introduction in other pattern matching applications when dealing with text/ascii content. More
Yesterday pixie, my RPi serving as the torrent/dlna box, stopped responding. Rebooting it doesnt help as it eventually reverts to only having the red LED on which I have started to interpret as the system is not yet booted.
I pulled pixie out of its nook and hooked it to my monitor before rebooting it. It showed that the boot process is encountering errors when reading from the SD card. The process stopped while asking for the root password to start the file check maintenance, or Ctrl-D to continue the boot process. I plugged a keyboard and here lies the conundrum: this is a debian system and I have been administering it as the pi user. I have been relying on the sudo mechanism and never replaced the root password so I cant provide it. That realization blows.
No other recourse now but to pull out the SD card and have the partition checked on my desktop. A “sudo fsck /dev/sdb2 -y” command (because sdb2 is the partition assigned to it by udev) and ten minutes of automated fixing later pixie is back online serving its DLNA goodness.
Now I made sure I have changed the root password so this can be fixed without booting the desktop. Come to think of it, I am doing it also on my Ubuntu desktop. 😉
Hectic schedule but I finally finished having my own TorrentBox/DLNA/UPnP server out of the Raspberry Pis. One concern that got answered is if the system is usable as a media streaming server as there has been reports of slow throughput since the Pi’s ethernet (network) and USB system share the same memory space. Early on the file I/O throughput on the SD card I am using as the BIOS and operating system is a little bit slow, and as a techie friend (named Gideon[1]) pointed out its the class of the card itself that is the bottleneck.
The instructions are all over the net so Ill just reference the articles I used and add the other stuff I did to make it work on Pixie (the name of this Pi). More
It was the first time to generate and send the report. It deals with downloading a lot of access logs, combining them based on certain scenarios, filtering out the cruft, slicing and dicing per service accessed and then tallying the responses to see if they meet the SLA.
The first manual extraction took around 4 hours to create the report for the most critical service. After that, I sat down and created the bash+awk script to do the slicing, dicing and tallying part. It took me 3 hours to create and test the script but after that I can generate the reports for 6 services in 30 minutes, where the bulk of the time was spent in downloading the latest logs (~10minutes) and pasting the data in Excel to create the “bayoootiful” graphs.
I figured if I can automate the rest then the reports can be generated under 15minutes, and I can hook it up on a continuous service so it will send it automatically every night. After that I can work on getting rid of the need to go through Excel if I can find some API to generate it and publish them as PDFs. JFree perhaps but my Java skills are already rusty. I also need something native if possible as I cannot install stuff on the office machines. The zLinux servers are pretty much off limits though I think there is a python interpreter installed.
One thing I can say is that automation and f/loss rocks. The script is too specific and covered by IPR so I cannot post it here but it is something that most scripters should be able to do.
This guide is created to show how to use the SmartBro USB Internet dongle in Ubuntu Linux. The dongle comes with the Windows installer that enables the SmartBro application to be installed in most computers. From within that application the user is able to send and reeive SMS, and connect/disconnect their Internet subscription. It allows more operations like access to the Smart portal but for the duration of this guide only the SMS send/receive and Internet configuration is covered. The instructions should be portable to the plug-it kits of the other telcos.
From my experience, Ubuntu has easily supported the USB dongles and tethering devices as early as Karmic Koala. I no longer have my Sony Ericsson K618i that I just connect via a USB cable to my MSI Wind U100 Netbook so this is what I will use for the guide. My netbook is sporting Natty Narwhal during the time the screenshots are taken.
Lets get cracking. Caveat though that I had to recreate some activities in two different locations so don’t mind the clock too much.
Configuring data connectivity
Boot into Ubuntu and connect the dongle. Wait for a few second while the system recognizes the device.
From the system tray, click on the network-manager applet and enable the “Enable Mobile Broadband” option. Select the “Edit Connections…” entry, and add a new entry under the “Mobile Broadband” tab.
As can be seen below, Ubuntu has already detected the chipset of the USB dongle. Click on the Forward button.
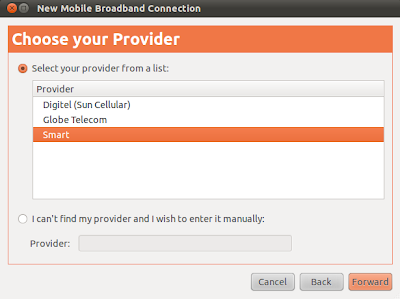
Select the provider (which in this case is Smart). Click on the Forward button.
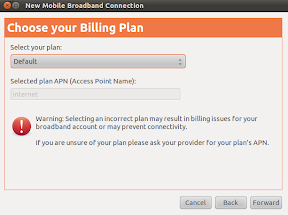
On the billing plan dialog, accept the default selection and click on the Forward button.
Confirm the summary of the selected settings by clicking the Apply button.
Visit back the settings of the created connection and ensure that there is no username and password in the Mobile Broadband settings page. Save any changes made and dismiss the wizard to go back to the desktop.
Click on the network-manager applet and click on the mobile internet entry created above.
If everything goes well and the signal is strong enough the user should be greeted with an established connection message.
Click on the network-manager to validate the type of connection.
Configuring SMS capability
The setup above can fail if the SIM card used is of the prepaid type and there is no credit loaded on the account. SMART imposes a Php10/30mins rate but there are promos that can be activated by sending some keywords via the SIM account. This implies that the SMS send and received facility should be accessed. Fortunately the wammu project provides this capability.
Install the wammu application by invoking the command below:
Start the wammu application. If the wammu application doesn’t find its configuration files then it will trigger a wizard for first time-configuration.
Click on the Next button to start the Wizard and select the following options in the succeeding windows:
– Configuration Style: Guided Configuration
– Configuration type: USB Cable (as the unit is plugged in a USB port)
– Phone Type: None of the above (unless future versions provide an option for the chipset)
– Connection Type: AT based
– Driver to use: Generic AT over serial line or it’s emulation
– Phone device: /dev/ttyUSB0
The above part is trial and error. If the test doesn’t succeed select the next option. If it succeeds then information about the model of the dongle will be shown. In my experience it is almost always /dev/ttyUSB0 but then I do have another device that emulates a serial connection via USB.
– Complete the remainder of the next dialog windows using the default option.
Once the wammu phone configuration is done, start accessing the USB dongle by invoking the Phone->Connect menu item.
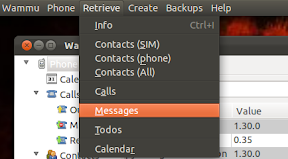
Once the dongle is active, test the connectivity by receiving existing messages.
After the operation succesfully completes, select the Messages item in the left treebox to view all retrieved messages.
Next is to try the SMS sending capability under the Create menu. The editor is dated compared to the built-in provider interface but it would suffice. In the screenshot below, the bucket promo of Always On is being triggered.
Check the Sent folder if the message was successfully sent.
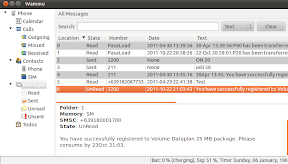
After a few seconds/minutes, retrieve the messages again to check the result of the promo registration.
And that is basically it. The instruction in this guide, with minor tweaks, should be applicable to any of the USB dongle. Enjoy your USB Internet dongle in Linux. 🙂
 RSS
RSS