Jan 18
ErinFLOSS, Gadget, Top of my head floss, raspberry pi, Tech
Yesterday pixie, my RPi serving as the torrent/dlna box, stopped responding. Rebooting it doesnt help as it eventually reverts to only having the red LED on which I have started to interpret as the system is not yet booted.
I pulled pixie out of its nook and hooked it to my monitor before rebooting it. It showed that the boot process is encountering errors when reading from the SD card. The process stopped while asking for the root password to start the file check maintenance, or Ctrl-D to continue the boot process. I plugged a keyboard and here lies the conundrum: this is a debian system and I have been administering it as the pi user. I have been relying on the sudo mechanism and never replaced the root password so I cant provide it. That realization blows.
No other recourse now but to pull out the SD card and have the partition checked on my desktop. A “sudo fsck /dev/sdb2 -y” command (because sdb2 is the partition assigned to it by udev) and ten minutes of automated fixing later pixie is back online serving its DLNA goodness.

Now I made sure I have changed the root password so this can be fixed without booting the desktop. Come to think of it, I am doing it also on my Ubuntu desktop. 😉
ciao!
Dec 29
ErinFLOSS, Gadget dlna, floss, raspberry pi, Tech, torrent
Hectic schedule but I finally finished having my own TorrentBox/DLNA/UPnP server out of the Raspberry Pis. One concern that got answered is if the system is usable as a media streaming server as there has been reports of slow throughput since the Pi’s ethernet (network) and USB system share the same memory space. Early on the file I/O throughput on the SD card I am using as the BIOS and operating system is a little bit slow, and as a techie friend (named Gideon[1]) pointed out its the class of the card itself that is the bottleneck.
The instructions are all over the net so Ill just reference the articles I used and add the other stuff I did to make it work on Pixie (the name of this Pi).
More
Dec 16
ErinGadget gadget, raspberry pi, Tech
I had some difficulty in locally procuring Raspberry Pis because even if there is a local RS branch, they initially sold a single batch for almost twice the price. When we last checked they are no longer selling them unless we are ordering by the hundreds to make it their while to import it. They said we could order directly from the UK office. Bummer.
Then I heard that Filepp, a colleague from a previous project, is on a short-term assignment in UK. So we grabbed the chance to ask a favor to procure a couple of RPis for us and now they have landed and the cases were given as gifts. (Note: Thank you Filepp. I’ll try not to torture you too much if I get to work with you again. Crap, we know I cant keep that promise 😉 ).
More
Nov 05
ErinFLOSS, Gadget, Technology floss, guide, hardware, internet, Linux
This guide is created to show how to use the SmartBro USB Internet dongle in Ubuntu Linux. The dongle comes with the Windows installer that enables the SmartBro application to be installed in most computers. From within that application the user is able to send and reeive SMS, and connect/disconnect their Internet subscription. It allows more operations like access to the Smart portal but for the duration of this guide only the SMS send/receive and Internet configuration is covered. The instructions should be portable to the plug-it kits of the other telcos.
From my experience, Ubuntu has easily supported the USB dongles and tethering devices as early as Karmic Koala. I no longer have my Sony Ericsson K618i that I just connect via a USB cable to my MSI Wind U100 Netbook so this is what I will use for the guide. My netbook is sporting Natty Narwhal during the time the screenshots are taken.

Lets get cracking. Caveat though that I had to recreate some activities in two different locations so don’t mind the clock too much.
Configuring data connectivity
- Boot into Ubuntu and connect the dongle. Wait for a few second while the system recognizes the device.
- From the system tray, click on the network-manager applet and enable the “Enable Mobile Broadband” option. Select the “Edit Connections…” entry, and add a new entry under the “Mobile Broadband” tab.

- As can be seen below, Ubuntu has already detected the chipset of the USB dongle. Click on the Forward button.

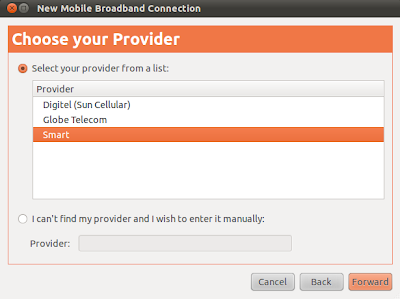
- Select the provider (which in this case is Smart). Click on the Forward button.
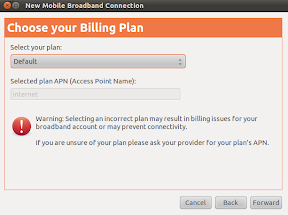
- On the billing plan dialog, accept the default selection and click on the Forward button.
- Confirm the summary of the selected settings by clicking the Apply button.

- Visit back the settings of the created connection and ensure that there is no username and password in the Mobile Broadband settings page. Save any changes made and dismiss the wizard to go back to the desktop.

- Click on the network-manager applet and click on the mobile internet entry created above.

- If everything goes well and the signal is strong enough the user should be greeted with an established connection message.

- Click on the network-manager to validate the type of connection.

Configuring SMS capability
The setup above can fail if the SIM card used is of the prepaid type and there is no credit loaded on the account. SMART imposes a Php10/30mins rate but there are promos that can be activated by sending some keywords via the SIM account. This implies that the SMS send and received facility should be accessed. Fortunately the wammu project provides this capability.
- Install the wammu application by invoking the command below:
sudo apt-get update && sudo apt-get install wammu -y
- Start the wammu application. If the wammu application doesn’t find its configuration files then it will trigger a wizard for first time-configuration.

- Click on the Next button to start the Wizard and select the following options in the succeeding windows:
– Configuration Style: Guided Configuration
– Configuration type: USB Cable (as the unit is plugged in a USB port)
– Phone Type: None of the above (unless future versions provide an option for the chipset)

– Connection Type: AT based
– Driver to use: Generic AT over serial line or it’s emulation
– Phone device: /dev/ttyUSB0

The above part is trial and error. If the test doesn’t succeed select the next option. If it succeeds then information about the model of the dongle will be shown. In my experience it is almost always /dev/ttyUSB0 but then I do have another device that emulates a serial connection via USB.
– Complete the remainder of the next dialog windows using the default option.
- Once the wammu phone configuration is done, start accessing the USB dongle by invoking the Phone->Connect menu item.

- Once the dongle is active, test the connectivity by receiving existing messages.
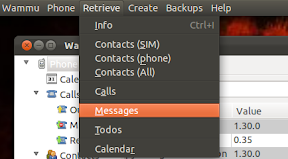
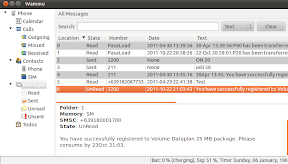
- After the operation succesfully completes, select the Messages item in the left treebox to view all retrieved messages.

- Next is to try the SMS sending capability under the Create menu. The editor is dated compared to the built-in provider interface but it would suffice. In the screenshot below, the bucket promo of Always On is being triggered.

- Check the Sent folder if the message was successfully sent.

- After a few seconds/minutes, retrieve the messages again to check the result of the promo registration.
And that is basically it. The instruction in this guide, with minor tweaks, should be applicable to any of the USB dongle. Enjoy your USB Internet dongle in Linux. 🙂
ciao!
Nov 29
ErinGadget, Garbage
Too much tinkering killed the cat. Now I am bummed out. 🙁
Time to watch another episode of The Walking Dead to pick myself up.
Jun 02
ErinGadget gadgets, want-to-buy
According to Yuga, my “current” dream Android phone will start arriving on June 18 but it is expected to fetch a price from Php35-40K.
Ouch. Yuga historically guesses the price pretty accurately or at least off by 1-2K. This one seems like the impossible dream at the moment but between this and the iPad I will opt for an Android phone.
Here is to hoping that Yuga’s guess is over by a big margin, or the Samsung Galaxy S is going to be cheaper….
ciao!
Feb 17
ErinGadget
The Google Nexus One (N1) is currently my “it” phone fantasy as the sub-30K price is pretty reasonable considering the features. However the Philippines is not included in the list of supported countries, it would require a bit of work-around to get it delivered here in the philippines. Yuga has the instructions here if you are interested. He also gave it a pretty decent review rating of a “steal”.
The only problem with the above method is that if the unit breaks then you have to RMA it to the the USA as the local HTC service centers will not accept it for repairs. It is a bit of risk taking that I don’t have the luxury at the moment (let’s assume that I have the money to buy it in the first place 🙂 ). This problem maybe no more as the HTC Desire (formerly codenamed as HTC Bravo) has just been announced and there is a strong possibility to come to Asia.

The HTC Desire (pictured above) has the same specifications as the Google N1 except that it has replaced the trackball with a trackpad. It also comes with HTC’s Sense UI which some N1 users are missing.
Time to save for the “unfortunate” case that I need to replace my phone. Hopefully the Desire will also be in the 30K or less range when it gets offered here commercially. 🙂
More details and pictures here: http://dvice.com/archives/2010/02/htc-desire-andr.php
ciao!
Feb 15
ErinGadget
When I bought my Sony-Ericsson(SE) K618i a couple of years ago it was because I want to be able to jump into the 3G bandwagon and have information in demand. While I was able to setup a SMART 3G account, browsing was limited to using the built-in browser which is pretty limiting (pun intended).
My attempts to tether my old Fujitsu-Siemens laptop using bluetooth and cable was not successful. Another factor might be because the laptop is too heavy to lug everyday to work and our home in Binangonan has non-existent 3G signal since we are in a mountainous region. The MSI Wind changed all that as portability is not much of an issue right now.
Being able to use my 3G phone via bluetooth is still a frustrating exercise and my iniitial attempts to use the SE phone suite is not much better. Everything changed when I explored the phone’s connectivity menu that I almost slapped myself for being stupid. For those that have SE phones, the following instructions may be useful for you:
Initial Requirements:
– A SE K618i phone with a configured 3G account. Refer to your telco provider for the setup instructions.
– A corresponding data cable for the phone.
– A laptop or desktop with enabled USB ports.
Instructions:
– In the phone menu, go to the Settings Menu.
– Navigate to the Connectivity->USB menu
– Configure the USB Data Accounts to your telco. Mine uses the “Smart Internet” configuration.
– Select the USB Internet item and set it to “On”
– Plug-in the cable to the port and the USB jack into your desktop.
That’s it. the USB Internet item actually makes your phone be detected as an ordinary USB Ethernet device which means your operating system will begin querying for an IP address when it detects it. Of course this assumes that your system is configured this way but most come this was as a standard. I use this setup for both Windows and Linux with no problem. I get varying result depending on location but this is handy when I need an internet connection in a jiffy. This also means I can put off buying a USB plug-it device until the price gets more wallet-friendly.
I am guessing the USB Ethernet option is also available in other Sony-Ericsson phones but I have not seen a similar feature on my wife’s Nokia E51. I haven’t looked thoroughly but will post an update if I do find one.
ciao!
Sep 23
ErinGadget
ExtremeTech has published an article announcing that the dual-core Atom processors (330) are now out. These processors are also designed for netbooks and UMPC but there is nothing that can stop anybody from putting this in small form-factor PCs to have a low-power, small, and inexpensive servers.
This would be another tease for those who are procrastinating about getting a UMPC since the current slew of models are only sporting the single-core chip (230). The A230 are already great for the need of the regular netbook user but having more cores would be better if you are doing more intensive processing. I hear that Photoshop on the current netbooks are bearable but having a dual-core unit would make it more tolerable. Code compilations and other number-crunching processes will also benefit from having an additional core. I wonder though how much would be the hit of the additional core on the battery life since if I am not mistaken the power draw has also doubled since the TDP of the 230 ranges between 2.5 to 4 watts. The increase might be tiny enough if viewed on the perspective of the benefits but the processor is part of the triumvirate of the power guzzlers for computers (hard disk and monitors complete the set).
For me, I will procrastinate again on getting my low-power download/storage server until the 330 becomes available locally. Hopefully there is a new chipset that will complement the low power draw as well since the current chipset for the 230 is not known for power efficiency.
And yes, there are reports that when it comes to performance per watt, the AMD Turion Mobile processor still beats the Atom processors. That is a testament to how efficient the AMD designs have been from the start. Too bad that there are no netbooks and UMPC model that sports these processors. 🙁
ciao!
Aug 30
ErinFLOSS, Gadget
Fixed by overriding the GRUB lines, editing the GRUB menu, and correcting the entries in the /etc/fstab.
Here is the original line that causes the bootup to panice:
kernel (hd1,0)/boot/vmlinuz BOOT_IMAGE=linux root=/dev/sdc10 vga=788
initrd (hd1,0)/boot/initrd.img
PCLinuxOS is configured to use the graphical GRUB menu so pressing the ESC key will allow the users to go into text mode that allows the editing of the line command. Pressing ‘e’ on the selected entry enabled to correct the order of hard drive being searched [ (hd0,0)/boot] as well as the correct root [root=dev/sda10]. After both the kernel and initrd lines have been updated, pressing ‘b’ will continue the boot process.
The GRUB entry is only half of the problem since the boot operationg still panics and dumps me in a command line. The culprit is that the fstab file still contains incorrect entries since all of the partitions are being searched at /dev/sdc. The USB flashdrive I used for the installation has 3 partitions so there are also 3 incorrect entries for it in /etc/fstab.
As I said, the boot process dumps me into a command line. This is where knowledge of vi comes very handy. It is small enough and ubiquitous enough to be in most *nix system. A quick ‘vi /etc/fstab’ to correct all linux partitions (and temporarily disable mounting of windows partitions) and I am now good to go. Invoking ‘mount -a’ confirms that I am able to successfully mount all partitions.
This problem is solved but unfortunately the PCLinuxOS Minime distribution is not the answer to my wireless in the Wind woes. 🙁
ciao!
Older Entries
 RSS
RSS