Jul 22
ErinFLOSS, Tipjar Linux, scripting, Tipjar

No time to read through contexts? Jump to the TL;DR; section.
There are use cases that require the secure wiping or deletion of files. There are already a lot of available utilities available in most modern distributions such as srm, swipe, etc. These however entail installing an additional package which is fine for work machines. The use case I had is to securely delete a transient file after it was generated and used in a Continuous Integration server. Installing the secure-delete package is trivial but a base Linux system already has the tool that can do the job: dd
More
Dec 05
ErinTipjar mobile, Tipjar, web
No time to read through contexts? Jump to the TL;DR; section.
For security reasons my internet access in the office is restricted and most if not all of the sites that allow saving of data is blocked by the office proxy server. This becomes a pain if I come across some articles and sites that would be good to read later or heaven forbid something that I need. The usual route that would allow me to schedule reading the article is to save the links in my company email drafts folder, or email it to myself so I can remember to move them to my bookmarking or reminder site when I get home. This setup has been fine but being the perennial procastinator (or busy if you want to put a positive spin on it) I sometimes forget to do it immediately. The other alternative is horrible: type the url on my android device as I encounter the sites and articles. That option is as pleasing as going to the doctor for a rectal probe. I forgot to mention that my Android device doesn’t have continuous Internet by the way, which would have made my life easier and this post an academic exercise. 🙂
I have an alternative solution which works if you have a QR reader on your device. The main gist is to transfer the information to the device using a QR code. The steps follow:
More
May 12
ErinFLOSS, Non-FLOSS, Tipjar regexp, text editor, Tipjar
The SOA server I am currently working with had a nasty quirk on its services that I havent figured out yet on how to fix: it fails on requests with an XML comment. We use SOAPUI to trigger requests and the quirk requires most of us to strip the comments that is automatically generated by the tool. This quirk however gives me a good segue on this IT tipjar: how to leverage pattern matching to batch remove comments. This should serve as an introduction in other pattern matching applications when dealing with text/ascii content.
More
Nov 11
ErinNon-FLOSS, Tipjar Tipjar, Windows 7
Aero is a default theme in Windows Vista and Windows 7 Home Premium or better but is not enabled by default. Aero adds some nifty features like Peek (showing thumbnail previews when hovering on the open programs), Shake (shaking the window minimizes all other windows), Snap (dragging the window to the edges snaps it, useful for side by side windows organization). Aero however consumes additional CPU and GPU power but in some cases it can introduce some efficiency like repainting only the areas that are affected by window movement.
Enabling Aero requires two services to be started before they can be used: the Desktop Windows Management (uxsms), and the Themes (themes) services. Enabling them from the Control Panel->Services MMC console is fairly easy but this tip jar is about enabling them from the command line to reduce the wait and teach the basics of interacting with the Windows services using command line options.
The command are split into two categories: making sure the services are enabled, and starting them up.
sc config uxsms start= auto
net start uxsms
sc config themes start= auto
net start themes
These are administrative activities so they need to be done from within a command window that has administrative privileges. Refer to previous TipJar entries on how to do this. The “auto” parameter of the sc commands can be changed to “demand” if the services are to be start manually so as not to consume resources ?at every Windows startup. The sc invocations are only required to be done once.
Nov 04
ErinNon-FLOSS, Tipjar Tipjar, Windows 7
This is a spin-off of the original article found here. For the rationale on the benefits and gotchas for hibernation then refer to the original post. This post is dedicated on how to enable hibernation in Windows 7 as the instruction has changed.
Enabling the hibernation feature requires that the process be done using an administrative account on the machine.
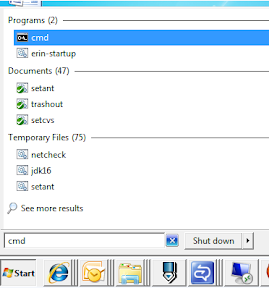
- Open an administrative command window by pressing the Window key, typing cmd, highlighting the cmd entry under the Programs group, and pressing Ctrl+Shift+Enter.
- Execute the command “powercfg -h on” to enable the hibernate feature.

- Open the Power Options group in the Control Panel and click the “Change plan settings” of the current active plan.
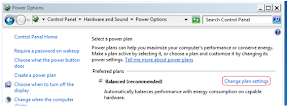
- Click on the “Change advanced power settings” link in the resulting window.

- Under the Sleep tree item, disable the hybrid sleep option. The hibernate option will not be available if this option is enabled.
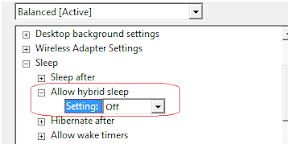
- Click on the Apply button and dismiss all succeeding dialog windows. The hibernate option should now be present on the Shutdown submenu.

ciao!
Jun 23
ErinTipjar, Top of my head CLI, Tipjar, Windows 7
At work, the Windows 7 workstation we were given came with a Trojan-esque gift: several instances of wscript.exe are running at startup and uses all available CPU processing cycles. Killing them off does not show any adverse effects (yet) but the graphical way is a bit time consuming as the machine is already slow at this point.
Below is the quickest way to snipe these instances using the lowest memory-guzzler tool in every Windows arsenal: the command line processor window. The only catch is that the wscript instances would require the kill command to be executed from an elevated command prompt as the Windows User Access Control (UAC) is active.
1. Press the Window key to bring up the startup menu.
2. In the Start menu search box, type “cmd”. The first entry highlighted is the program entry.
3. Press “Ctrl+Shift+Enter” to run the command in elevated mode. If UAC is really running, a confirmation prompt will be displayed for the command line processor.

4. Invoke the command “taskkill /im wscript.exe /f ” to kill all running instances of wscript.exe.
5. To validate if there are still instances running, run the command “tasklist | find “wscript” ” (omit the first and last double quotes). Nothing should be shown.
The exercise above can be adapted to quickly kill some errant processes without going through the task manager or resource monitor GUI clients. Be careful in what you kill for it might bite back. 🙂
[UPDATE] A colleague,Ron Emil Castro, has provided this trick on combining both in a script that will load up with administrator privileges upon startup for Vista/Win7 machines.
- Create a batch script with the following code
                    CHOICE /N /C YN /T 15 /D Y

                    taskkill /im wscript.exe /f
The first command waits for 15 seconds to give the script enough time to run and the second kills it as specified in the script above.
- Open the startup folder by right-clicking on the Start->All Programs->Startup item then selecting the Open option.
- Create a shortcut to the batch script. Right-click on the shortcut and open the properties window. Select the “Run as Administrator” option under the Advanced section.
[UPDATE] The processes are because of an errant firewall checker script loaded by the domain policies. The alternate solution provided by the support team is to execute the C:\Windows\system32\wscript.exe binary and set the timeout to a low number (5 or 10 seconds). Use the recommendation at your own risk as this basically handicaps the execution of other scripts that would require more time than the set timeout.
Feb 14
ErinTechnology, Tipjar Tipjar, web
Have you encountered an unfamiliar word when reading email or an article in the web? Normally this would require a quick dictionary search but Google may present an easier route. Navigate your internet browser to www.google.com and enter the following in the search box:
define:[place unfamiliar word here]
If it is popular enough, Google will present the searched definitions.

Popular and upcoming words can also be searched:

Browsers equipped with a Google search bar may offer keyboard shortcuts that will make the process easier. For Firefox, Ctrl+K will send the focus to the search bar.
Jan 28
ErinNon-FLOSS, Technology, Tipjar Tipjar, windows
[Advanced Disclaimer: Use the information in this posting at your risk]
If you want to minimize the amount of electricity used by your computer but dislike shutting down your computer because of the amount of time it need to start it up and open your applications, there is a compromise to be had if your operating system is configured properly to hibernate.
Hibernating an operating system means that all the information in the system memory (RAM to be precise) is written down as a “snapshot image” to the hard disk. The PC hardware is then turned off since the hard disk will not lose its information when powered down. When the machine is turned back on, the booting process of the operating system will look for a store snapshot image and load it back into the system memory. If this is successful, you will have your desktop at the same state as when it was hibernated. The time it needs to resume a hibernated image is relatively small compared to when booting the operating system from scratch (or what is called a cold boot).
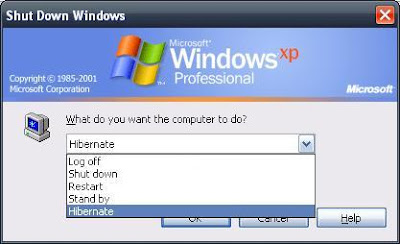
All modern operating systems have support for hibernation but not all are enabled by default. To following steps will enable this feature in Windows XP:
- Go to Start->Control Panel->Power Options.
- Go to the “Hibernate” tab and ensure that the “Enable hibernation” check box is ticked. Click OK to dismiss the dialog and apply the change.
WARNING: This will reserve space on the system drive equal to the amount of RAM in your computer. If you have 2GB of RAM, 2GB of hard disk space will be set aside for hibernation.
- To hibernate, shutdown the machine but select the hibernate option. The machine will be turned off automatically (if this is properly configured).
- To resume the hibernated image, turn on the machine. The image will be invalidated after a successful resume.
NOTES:
– Some applications, usually those that have time-bound login sessions, do not like being hibernated.
– The space set aside for the hibernation support is different with the space allocated for the virtual memory.
– If the machine fails to resume or hangs while in the process of resuming, reboot the machine and boot into safe mode (Press F8 after the BIOS screens). Reboot the machine to invalidate the hibernate images and the machine should boot normally after.
Jan 26
ErinNon-FLOSS, Technology, Tipjar Tipjar, windows, zip
Zip integration was introduced starting Windows XP which enables the Windows Explorer to treat zip archives as a normal directory. This allows users to visit the content structure of the archive without depending on an external application like Winzip or extracting the content.
The downside of this integration is that Windows Explorer needs to finish reading all of the zip archives in the directory being visited before the directory contents are listed. This can cause a significant performance slowdown if there are many or huge zip files in the directory.
To disable the zip integration, the following command can be invoked (requires admin privileges):
regsvr32 /u zipfldr
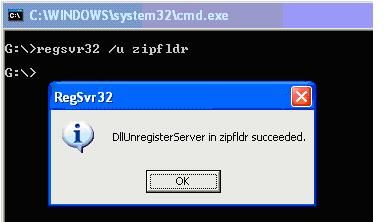
The command above will clear all zip file associations. If you have Winzip installed, launch a new instance and Winzip will prompt if you want to restore the association. Select the ‘Yes‘ option otherwise zip archives will not be handled properly when double-clicked from Windows Explorer.

If another archiver utility is used, look around the preference page for the association options if the prompt doesnt show at the startup of the the utility.
NOTES:
- If Winzip was configured to not show the prompt above, the associations can be done from the Tools->Configuration->System menu.
- If you are using a different application for handling archives (e.g. WinRar, 7zip, etc.), explore it’s configuration window or refer to the manual.
-
- The command “regsvr32 zipfldr” will restore the zip integration of Windows Explorer.
-
- BONUS: Dump Winzip and switch to 7zip. It supports more archive types, achieves significantly better compression, and best of all it is Open Source and free!
Jan 26
ErinNon-FLOSS, Technology, Tipjar Tipjar, windows
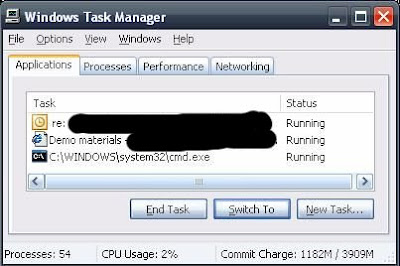
Windows Explorer suddenly died and you are left with a bunch of application windows open. Before you perform a hard reboot by flicking off the switch, here are a few tips to enable the system to cleanly recover or reboot. These are all assuming that the system is still responsive.
Restart Windows Explorer
The Windows taskbar is actually handled by an instance of Windows Explorer. To launch a new instance, the following may be done:
- Press “Alt+Tab” to cycle to an open command terminal. Execute the command “explorer” from there.
- Press “Ctrl+Alt+Delete” and press the “Task Manager” button to launch the task manager. Navigate to the Applications tab and use the “New Task…” button to execute the “explorer” command.
If the mouse is also not responsive, you can use the “Tab” button to navigate the controls in the dialog windows.
Restart Windows
If the new Windows Explorer instance also refuses to function, a soft boot of the operating system would be in order. Since the “Start->Logoff” menu will also be inaccessible, try using the shutdown command to restart the machine.
- Press “Alt+Tab” to cycle to an open command terminal. Execute the command “shutdown -r” from there.
- Press “Ctrl+Alt+Delete” and press the “Task Manager” button to launch the task manager. Navigate to the Applications tab and use the “New Task…” button to execute the “shutdown -r” command.
The shutdown command also has a graphical interface if you prefer to use a Window to shutdown a window. Invoke the command “shutdown –i” to launch the GUI.

If all else fails
A hard boot is the only remaining option. Try pressing and holding the power-off button for a few seconds to invoke the motherboard’s power-down feature. If this still doesn’t work then go for the last resort of pulling the plug.
Older Entries
 RSS
RSS