Nov 30
ErinTop of my head recipe
Some things that I realized today:
– boil a liter of water with some lemongrass stalks, steep 1-2 tea bags. Strain and cool. Doesn’t taste much but smells wonderful. Remember to sweeten it with honey or brown sugar.
– Sliced lemon adds flair to the iced tea but dont leave it in the pitcher. It will make the whole batch bitter. 🙁
– I love eating chico, but putting it in oatmeal is just plain wrong.
– making teriyaki sauce is a breeze. Just mix 2 cups water, 1/2cup soy sauce (light if available), 3/4 cups brown sugar, 2-3 tbsp cornstarch, 2tbsp minced garlic. Cook until it thickens a bit.
– fried tokwa cubes with teriyaki sauce and some chopped onion leaves = heavenly fare/snack.
ciao!
Nov 18
ErinTop of my head educational toys
Looking for where I can buy this or something similar locally. They come in multiple colors and about half to an inch in diameter. Thanks.
Nov 16
ErinTop of my head
that which sustains me will in all likelihood kill me.
Nov 11
ErinNon-FLOSS, Tipjar Tipjar, Windows 7

Aero is a default theme in Windows Vista and Windows 7 Home Premium or better but is not enabled by default. Aero adds some nifty features like Peek (showing thumbnail previews when hovering on the open programs), Shake (shaking the window minimizes all other windows), Snap (dragging the window to the edges snaps it, useful for side by side windows organization). Aero however consumes additional CPU and GPU power but in some cases it can introduce some efficiency like repainting only the areas that are affected by window movement.
Enabling Aero requires two services to be started before they can be used: the Desktop Windows Management (uxsms), and the Themes (themes) services. Enabling them from the Control Panel->Services MMC console is fairly easy but this tip jar is about enabling them from the command line to reduce the wait and teach the basics of interacting with the Windows services using command line options.
The command are split into two categories: making sure the services are enabled, and starting them up.
sc config uxsms start= auto
net start uxsms
sc config themes start= auto
net start themes
These are administrative activities so they need to be done from within a command window that has administrative privileges. Refer to previous TipJar entries on how to do this. The “auto” parameter of the sc commands can be changed to “demand” if the services are to be start manually so as not to consume resources ?at every Windows startup. The sc invocations are only required to be done once.
Nov 08
ErinTop of my head marriage, quip
While driving home:
Spouse: Tanga ka bang talaga o tanga ka lang?
Spouse2: Tanga ka lang.
Simple no?
Nov 05
ErinFLOSS, Gadget, Technology floss, guide, hardware, internet, Linux
This guide is created to show how to use the SmartBro USB Internet dongle in Ubuntu Linux. The dongle comes with the Windows installer that enables the SmartBro application to be installed in most computers. From within that application the user is able to send and reeive SMS, and connect/disconnect their Internet subscription. It allows more operations like access to the Smart portal but for the duration of this guide only the SMS send/receive and Internet configuration is covered. The instructions should be portable to the plug-it kits of the other telcos.
From my experience, Ubuntu has easily supported the USB dongles and tethering devices as early as Karmic Koala. I no longer have my Sony Ericsson K618i that I just connect via a USB cable to my MSI Wind U100 Netbook so this is what I will use for the guide. My netbook is sporting Natty Narwhal during the time the screenshots are taken.

Lets get cracking. Caveat though that I had to recreate some activities in two different locations so don’t mind the clock too much.
Configuring data connectivity
- Boot into Ubuntu and connect the dongle. Wait for a few second while the system recognizes the device.
- From the system tray, click on the network-manager applet and enable the “Enable Mobile Broadband” option. Select the “Edit Connections…” entry, and add a new entry under the “Mobile Broadband” tab.

- As can be seen below, Ubuntu has already detected the chipset of the USB dongle. Click on the Forward button.

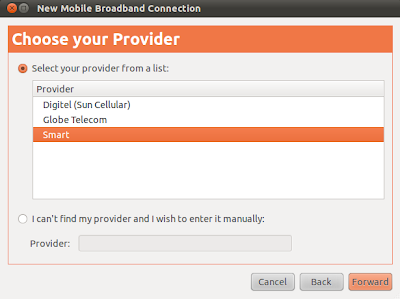
- Select the provider (which in this case is Smart). Click on the Forward button.
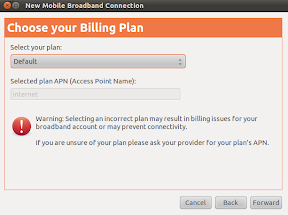
- On the billing plan dialog, accept the default selection and click on the Forward button.
- Confirm the summary of the selected settings by clicking the Apply button.

- Visit back the settings of the created connection and ensure that there is no username and password in the Mobile Broadband settings page. Save any changes made and dismiss the wizard to go back to the desktop.

- Click on the network-manager applet and click on the mobile internet entry created above.

- If everything goes well and the signal is strong enough the user should be greeted with an established connection message.

- Click on the network-manager to validate the type of connection.

Configuring SMS capability
The setup above can fail if the SIM card used is of the prepaid type and there is no credit loaded on the account. SMART imposes a Php10/30mins rate but there are promos that can be activated by sending some keywords via the SIM account. This implies that the SMS send and received facility should be accessed. Fortunately the wammu project provides this capability.
- Install the wammu application by invoking the command below:
sudo apt-get update && sudo apt-get install wammu -y
- Start the wammu application. If the wammu application doesn’t find its configuration files then it will trigger a wizard for first time-configuration.

- Click on the Next button to start the Wizard and select the following options in the succeeding windows:
– Configuration Style: Guided Configuration
– Configuration type: USB Cable (as the unit is plugged in a USB port)
– Phone Type: None of the above (unless future versions provide an option for the chipset)

– Connection Type: AT based
– Driver to use: Generic AT over serial line or it’s emulation
– Phone device: /dev/ttyUSB0

The above part is trial and error. If the test doesn’t succeed select the next option. If it succeeds then information about the model of the dongle will be shown. In my experience it is almost always /dev/ttyUSB0 but then I do have another device that emulates a serial connection via USB.
– Complete the remainder of the next dialog windows using the default option.
- Once the wammu phone configuration is done, start accessing the USB dongle by invoking the Phone->Connect menu item.

- Once the dongle is active, test the connectivity by receiving existing messages.
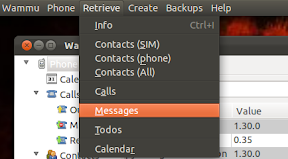
- After the operation succesfully completes, select the Messages item in the left treebox to view all retrieved messages.

- Next is to try the SMS sending capability under the Create menu. The editor is dated compared to the built-in provider interface but it would suffice. In the screenshot below, the bucket promo of Always On is being triggered.

- Check the Sent folder if the message was successfully sent.

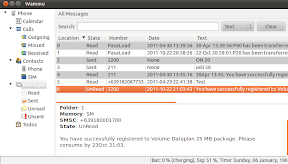
- After a few seconds/minutes, retrieve the messages again to check the result of the promo registration.
And that is basically it. The instruction in this guide, with minor tweaks, should be applicable to any of the USB dongle. Enjoy your USB Internet dongle in Linux. 🙂
ciao!
Nov 05
ErinRubbish Garbage
Chin Wong has a blog post about a site offering and campaigning for free text books. The idea is really a novel one (pun intended ;P ) wherein it spouts a utopian scenario that teachers and knowledgeable scribes contribute in evolving the textbook contents. I am however skeptical if it would be applicable here in the Philippines.
Face it, all schools offering academic teaching below the collegiate level makes a killing out of book and supplies sales. What else can explain the sudden surge for workbooks wherein it requires the students to rip out pages for submission?
A decade or so ago ripping books is considered a sacrilegious activity. Anybody doing it is labeled as an ignorant vandal who doesn’t understand the value of the knowledge printed in the pages they are destroying. Books are something that is cared for and passed on to a younger sibling or to the child of the neighbor who would be using them again in their quest of enlightenment (or that elusive diploma). As a self-professed voracious reader and book lover, I almost cried when I opened my niece’s workbook from a previously concluded school year. It looked like a middle-aged person raped violently by a ward of death-row convicts.
Then there is the sudden upsurge in the practice of selling school supplies with official schools seals. The problem is that these cost double than what it would normally sell in the free market. School officials argue that the latter promotes equality among its students because nobody uses luxurious items like high-end ballpoint pens and notebooks with high-substance paper. If that is the case then why the high price point? If printing the official seal doubles the price then why not just pick a standard supplier for the materials and enforce that, or subsidize the materials themselves. Why can’t those materials be considered as the norm but still allow students to use the cost-effective Panda ballpen?
I think it is the older man in me talking but the academe circles has degraded to the point that we now have schools being ran as businesses first and learning institutions second.
ciao!
Nov 04
ErinNon-FLOSS, Tipjar Tipjar, Windows 7
This is a spin-off of the original article found here. For the rationale on the benefits and gotchas for hibernation then refer to the original post. This post is dedicated on how to enable hibernation in Windows 7 as the instruction has changed.
Enabling the hibernation feature requires that the process be done using an administrative account on the machine.
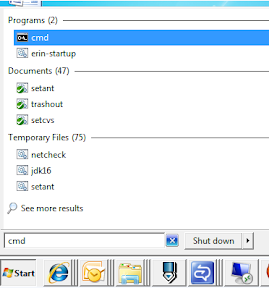
- Open an administrative command window by pressing the Window key, typing cmd, highlighting the cmd entry under the Programs group, and pressing Ctrl+Shift+Enter.
- Execute the command “powercfg -h on” to enable the hibernate feature.

- Open the Power Options group in the Control Panel and click the “Change plan settings” of the current active plan.
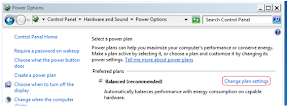
- Click on the “Change advanced power settings” link in the resulting window.

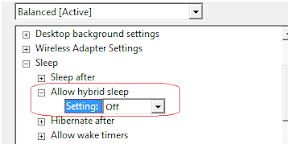
- Under the Sleep tree item, disable the hybrid sleep option. The hibernate option will not be available if this option is enabled.
- Click on the Apply button and dismiss all succeeding dialog windows. The hibernate option should now be present on the Shutdown submenu.

ciao!
Nov 03
ErinTop of my head Fun Stuff, prank, reminiscing
This post is in reference to the DST practice in most countries. This affects even those of us in the equatorial belt because we deal with them.
We don’t have DST but during college I adjust my wristwatch to advance by 45 minutes. It is for those who look at my watch (e.g. in public transport) without asking for permission. Then I try not to giggle when I see their expression change drastically when they doubt if they are still on time with their appointments.
This also works even if they have their own clocks because even if they assume that my clock is 30 minutes in advance then they are now already behind by 15 minutes. Sadly the effectiveness of this prank is lessened now that most people have cellphones and the possibility of the internal digital clock being wrong is very, very small. 🙂
Nov 03
ErinTop of my head
Using the latest ffmpeg:
ffmpeg -i input.mkv -target ntsc-vcd output.avi
If your player only reads PAL then swap ntsc- with pal-
 RSS
RSS