Jan 26
ErinNon-FLOSS, Technology, Tipjar Tipjar, windows, zip

Zip integration was introduced starting Windows XP which enables the Windows Explorer to treat zip archives as a normal directory. This allows users to visit the content structure of the archive without depending on an external application like Winzip or extracting the content.
The downside of this integration is that Windows Explorer needs to finish reading all of the zip archives in the directory being visited before the directory contents are listed. This can cause a significant performance slowdown if there are many or huge zip files in the directory.
To disable the zip integration, the following command can be invoked (requires admin privileges):
regsvr32 /u zipfldr
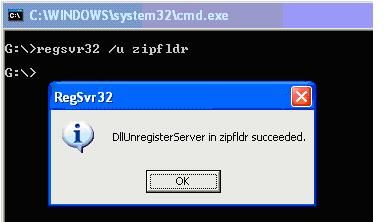
The command above will clear all zip file associations. If you have Winzip installed, launch a new instance and Winzip will prompt if you want to restore the association. Select the ‘Yes‘ option otherwise zip archives will not be handled properly when double-clicked from Windows Explorer.
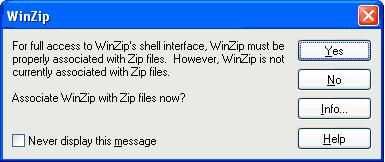
If another archiver utility is used, look around the preference page for the association options if the prompt doesnt show at the startup of the the utility.
NOTES:
- If Winzip was configured to not show the prompt above, the associations can be done from the Tools->Configuration->System menu.
- If you are using a different application for handling archives (e.g. WinRar, 7zip, etc.), explore it’s configuration window or refer to the manual.
-
- The command “regsvr32 zipfldr” will restore the zip integration of Windows Explorer.
-
- BONUS: Dump Winzip and switch to 7zip. It supports more archive types, achieves significantly better compression, and best of all it is Open Source and free!
Jan 26
ErinNon-FLOSS, Technology, Tipjar Tipjar, windows
Windows Explorer suddenly died and you are left with a bunch of application windows open. Before you perform a hard reboot by flicking off the switch, here are a few tips to enable the system to cleanly recover or reboot. These are all assuming that the system is still responsive.
Restart Windows Explorer
The Windows taskbar is actually handled by an instance of Windows Explorer. To launch a new instance, the following may be done:
- Press “Alt+Tab” to cycle to an open command terminal. Execute the command “explorer” from there.
- Press “Ctrl+Alt+Delete” and press the “Task Manager” button to launch the task manager. Navigate to the Applications tab and use the “New Task…” button to execute the “explorer” command.
If the mouse is also not responsive, you can use the “Tab” button to navigate the controls in the dialog windows.
Restart Windows
If the new Windows Explorer instance also refuses to function, a soft boot of the operating system would be in order. Since the “Start->Logoff” menu will also be inaccessible, try using the shutdown command to restart the machine.
- Press “Alt+Tab” to cycle to an open command terminal. Execute the command “shutdown -r” from there.
- Press “Ctrl+Alt+Delete” and press the “Task Manager” button to launch the task manager. Navigate to the Applications tab and use the “New Task…” button to execute the “shutdown -r” command.
The shutdown command also has a graphical interface if you prefer to use a Window to shutdown a window. Invoke the command “shutdown –i” to launch the GUI.

If all else fails
A hard boot is the only remaining option. Try pressing and holding the power-off button for a few seconds to invoke the motherboard’s power-down feature. If this still doesn’t work then go for the last resort of pulling the plug.
Jan 05
ErinNon-FLOSS, Technology, Tipjar Tipjar, windows
If you need to free storage space in your C:\ drive, here are the following files that are *relatively* safe to remove. See notes and disclaimer below.
- Log files placed in log directories. Consult the application manual or your friendly neighborhood techie if you are in doubt.
- Files with the “BAK” or “BACK” extensions. These are usually temporary files created by applications performing actions that physically alter the files. Evaluate if you still need the backup prior to removal.
- Files with names starting with the tilde (~) symbol. These are temporarily files created by some applications (notably MS Office) that it failed to remove after the file was closed.
- Zip files created to send whole directories via email. These should ideally be deleted after sending but for some reason they were left there. 🙂
- [May require elevated privileges] Contents of the “%SYSTEMROOT%\Temp” directory. Delete as much of the files you can but there will be some file not available for removal as they are currently in use.
- Contents of the “%USERPROFILE%\Local Settings\Temp” directory. Delete as much of the files as you can but there will be some not available for removal as they are currently in use.
- [May require elevated privileges] Directories in “%SYSTEMROOT%” that follows the format “[identifier]$”. These are information required to uninstall Official Windows patches.
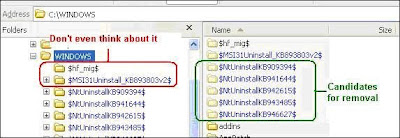
- DO NOT REMOVE directories that do not follow the format above.
Notes and Mandatory Disclaimer:
- As this tip deals with deleting of files, the information is intended for educational purposes only. Please think twice about permanently removing files (shift+delete, removing from the recycle bin). Use the information above at your own risk.
- To know where your %SYSTEMROOT% and %USERPROFILE% directories are, execute the command echo “%SYSTEMROOT%” and echo “%USERPROFILE%” in a command window.
- When removing uninstall information for Windows patches, consider leaving behind folders with “Date Modified” values of at most one month prior to the current date. The probability of uninstalling patches installed at older dates becomes small if the machine is in constant use.
- Some files may require elevated privileges that are not granted to normal users. If this is the case and you need to free up space, seek assistance from your workstation administrator.
Nov 11
ErinTipjar, Top of my head Tipjar
I am maintaining an infrequent office distribution list that contains some tips and tricks regarding common utilities and apps that we use at work. I call that “newsletter” as “IT TipJar” which was initially intended for my co-project members. To quote the last description in an internal office blog:
What is normally just an email push to the members of our project team will now be mirrored in this blog. The primary reason is I am rolling-off from the project and there might be some people who are still interested to receive such information. Mail versions are still being pushed to my current project and those who have expressed interest in getting them but for the rest this personal blog would do.
What is It Tip Jar? It started as a cheesy IT tips and trivia posts that I think will help improve the day-to-day tasks while working with computers. Or at least get an understanding with how things work.
Isn’t that similar to the working smarter memos from CIO? Yes but the difference is that I am not taking responsibility with the tips and content I am sending out. I am not a nanny and I am a firm believer that our people actually have the necessary brain cells to decide what is morally proper. Just like the maxim “guns don’t kill. people do.” what I send out are just tools that can be gleaned from the Internet (which is probably where I find most of them in the first place) so whatever you do with them and the consequences are your own problem.
The decision to mirror the content here is that I also send the content to colleagues who have already left the company and who have express their intent to still keep on receiving these posts. The extra work would be worth it as that is how much I love you guys/gals. 🙂
ciao!
Oct 12
ErinNon-FLOSS, Technology, Work SCM, Work
Installing RTC 2.0 client on the Win2003 machine provided by our customer is proving to be a challenge of patience and futility. I spent the better half of the day trying everything I can think of but:
– Using the bundled launchpad doesnt do anything: everything just quits without any warning or error.
– Invoking the launchpad using the parameters in the autorun.inf file () doesnt work.
– Invoking launchpad\launchpad.bat terminates with a wrong variable expansion.
– Invoking the various installer executable inside the win32 sub-directory produces a “Missing file install.xml” error and then will show the Installation Manager window. Unfortunately it cannot install anything even if the preference shows the repository to the RTC 2.0 extracted files are detected as “connected”.
I know the installer works because we have installed it fine on our WinXP workstations. The md5sum of the file in the Win2003 machine matches the one in our XP workstations.
Ready to give up and log a RTC bug, I did some more fiddling to gather more information and tried to download the web install even if it is going to be painful installing RTC on a slow and erratic connection. I got the same results.
Then I noticed that there were lots of files named install-[something].xml in the win32 directory but no install.xml file. An idea hit me and created a copy of the “install-client.xml” and renamed it to “install.xml”. I then executed the win32\install.exe and everything installed as expected.
And that concludes a whole-day wrangling on getting RTC 2.0 installed in the Win2003 server. Sometimes the best solutions are really those that hide under our noses. 🙁
ciao!
Jun 03
ErinNon-FLOSS, Technology
We have a Rational Team Concert process that is executed by a scheduled task. The task tries to download the code from a server that unfortunately does act up from time to time during the middle of the download process. RTC currently does not have a retry function so the result needs to be manually checked and the process be restarted. Its not convenient so I created a batch loop in order to minimize the human interaction.
Below is the base script that will retry the operation up to the figure specified in the attempts variable. The script uses the ping command to effect a delay between the retry attempts. For what it is worht I am releasing it under Creative Commons just for the sake of attribution. 🙂
REM

REM Function: A sample batch script on how to retry a utility or another batch script that fails intermittently.

REM

REM Author: ramfree17

REM Email:  ramfree17@gmail.com

REM

REM License under: Creative Commons Attribution v3.0 Unported [http://creativecommons.org/licenses/by/3.0/]

REM
@echo off
set attempts=10
set counter=0
call :load_func
goto done
:load_func
set /a counter+=1
echo Attempt %counter% out of %attempts%
if %counter% GTR %attempts% goto :eof
C:\ibm\sdp\scmtools\eclipse\scm load "TestWS" -r "https://someserver.com/jazz" -u "testUser" -d "d:\Workspace\rtc" -f -P [password]
REM Check the result. 0 is successful.
if %ERRORLEVEL% NEQ 0 ( ping -n 10 google.com
call :load_func)
goto :eof
:error_section
echo. ERROR: Unable to perform the action. Please see the log if any.
:done
echo exiting sample script.
Mar 12
ErinNon-FLOSS, Technology
This morning I was copying some files in my USB drive and I found some peculiar files in the root directory: password_viewer.exe and autorun.inf. These are peculiar because I have embarked in a personal Use Linux-only policy in my home systems so I have no need for Windows auto-run feature and I hate that feature to the core so I disable them. I did some quick searching in the Internet and these are normally associated with the w32.sillyfdc worm.
This got me thinking on where I would have contracted that virus as I am pretty paranoid when it comes to my devices. Then it hit me, I had some photos developed at Picture City Digital shop in Robinson’s Pioneer. Sure, I saw the attendant run a manual AVG scan on the contents of my thumb drive but apparently it was not enough because: (1) the scanner real-time file protection was not activated, and (2) I am not sure when was the last time they have updated their virus definitions.
No big deal for me really because I was already prepared to have my drive infected as I only have the pictures to be developed in there. I think the scanning procedure done in the shop threw me back into a sense of complacency that I didn’t double check anymore if it was infected. The drive was used once more by my officemate on his Vista-loaded laptop but I am confident that he is as paranoid as me and his AVG was able to quarantine the infection automatically. He didn’t even notice it until I brought it up this morning.
My take-away tips for this experience are:
- Convert to using linux as your primary system. Ok, I just have to put that in. 🙂
- If using printing shop services for your digital pictures, put them in a read-only media like a CDRW or a SD-card with the write-lock enabled.
- If you are adamant in using Windows, turn-off the auto-play feature altogether. Most of the time it is more trouble than useful.
- When using Windows, keep your anti-virus software and definitions up to date and turn-on the real-time file protection if you have a habit of inserting media used from untrusted places.
ciao!
Feb 15
ErinGadget
When I bought my Sony-Ericsson(SE) K618i a couple of years ago it was because I want to be able to jump into the 3G bandwagon and have information in demand. While I was able to setup a SMART 3G account, browsing was limited to using the built-in browser which is pretty limiting (pun intended).
My attempts to tether my old Fujitsu-Siemens laptop using bluetooth and cable was not successful. Another factor might be because the laptop is too heavy to lug everyday to work and our home in Binangonan has non-existent 3G signal since we are in a mountainous region. The MSI Wind changed all that as portability is not much of an issue right now.
Being able to use my 3G phone via bluetooth is still a frustrating exercise and my iniitial attempts to use the SE phone suite is not much better. Everything changed when I explored the phone’s connectivity menu that I almost slapped myself for being stupid. For those that have SE phones, the following instructions may be useful for you:
Initial Requirements:
– A SE K618i phone with a configured 3G account. Refer to your telco provider for the setup instructions.
– A corresponding data cable for the phone.
– A laptop or desktop with enabled USB ports.
Instructions:
– In the phone menu, go to the Settings Menu.
– Navigate to the Connectivity->USB menu
– Configure the USB Data Accounts to your telco. Mine uses the “Smart Internet” configuration.
– Select the USB Internet item and set it to “On”
– Plug-in the cable to the port and the USB jack into your desktop.
That’s it. the USB Internet item actually makes your phone be detected as an ordinary USB Ethernet device which means your operating system will begin querying for an IP address when it detects it. Of course this assumes that your system is configured this way but most come this was as a standard. I use this setup for both Windows and Linux with no problem. I get varying result depending on location but this is handy when I need an internet connection in a jiffy. This also means I can put off buying a USB plug-it device until the price gets more wallet-friendly.
I am guessing the USB Ethernet option is also available in other Sony-Ericsson phones but I have not seen a similar feature on my wife’s Nokia E51. I haven’t looked thoroughly but will post an update if I do find one.
ciao!
Nov 08
ErinNon-FLOSS
My Windows XP installation is acting up again. For some reason I cannot pinpoint directories will change permission and it locks me out with an “Access Denied” permission. The problem is that I am logged in as a local administrator (hey, its Windows so its the only way to really work while in it 😛 ) and following the maxim “Computer Security stops with full physical access” then everything should be available to me. First reaction would be to check and modify the file security properties but since I don’t have “access” then the Security tab will not show in the properties window of the file.
Normally I would note the directory down somewhere in the desk, wait finishing my current work, and then reboot to Linux and access the files. Linux allows me to bypass the NTFS access control list so I can take out the files and move/copy them to a new location before deleting the old location. I run a chkdsk next time I boot into Windows to reset the index and have a semblance of sanity in the drive.
Today this can’t be my route as it locked a directory containing some files that I need for the current document I am working on. Rebooting to Linux to bail out Windows is not an option so I searched a way on how to circumvent this, and now I have two (well technically one with a backup).
CACLS
CACLS is the built-in command line utility for modifying file access control lists in Windows. Invoking the help file (cacls /?)presents a pretty concise and helpful help message. To give my user account full access to the misbehaving directory and all the files inside, the command is
cacls [path to directory to be change] /T /G Erin:F
where /T specifies that all contents of the directory will be modified and the last switch tells the utility to give user name Erin full access.
If the cacls command still fails for your admin user, then try using the SYSTEM user as that generally have more privileges than the administrator users. You basically need to execute the same CACLS command under that privilege but the “runas” command will not work as you will need the SYSTEM password. You will have to trick the machine into opening the doors for you [insert devil grin here]. Not really, I was talking about the Scheduler trick that is only accessible to Administrators and some special user groups.
AT HH:MM /INTERACTIVE cmd.exe
HH and MM is to be replaced with the time + one or two minutes from the current system time (use 24H format for the hours). This will trigger the task scheduler to open a command prompt at the set time which uses the SYSTEM account. You can try the cacls modification from the resulting prompt.
And if all else fails, there is always Linux. 😀
ciao!
Sep 26
ErinLaboratory
I need to run the Rational Team Concert Jazz Build Engine as a Windows service as we need it to run non-stop as part of the continuous integration service. The catches though are
- it (theoretically) wouldn’t stop as it keeps on waiting for build requests from the RTC server. This makes it as an unlikely candidate for scheduled tasks unless I will cookup a script for terminating it before the actual run. Messy if I still have to check if there is a build in progress.
- the machine hosting it is not a dedicated machine so a couple of admins usually login to do some stuff which kills any running processes executed by the currently logged-in user.
Windows provides the sc.exe utility for creating and removing Windows services but it only accepts executables and not scripts. I have to set some environment properties and parameters so this is out of the running. The Java Service Wrapper is a good alternative but I misread the instructions so ended up using the AutoExnt utility in the Win2003 Resourse Kit. The files are still usable in Windows XP.
Only three files are needed from the kit namely Autoexnt.exe, instexnt.exe and servmess.dll. These files are to be dropped in the %SYSTEMROOT%\system32 directory.. The next step is to create the %SYSTEMROOT%\system32\autoexnt.bat (the file needs to be named like that) with the commands to be executed. My script looked something like this:
@echo off

setlocal

REM

REM Workstation specific settings.

REM

set JBE_Eclipse_Dir=C:\Apps\IBM\jazz\buildsystem\buildengine\eclipse

set JBE_Repository_URL=https:///jazz

set JBE_EngineID=ToolingBuilder

set JBE_user=kerberos

set JBE_password=
REM
REM If proxy is not needed, switch the JBE_VMArgs_OPTS to use the empty one
REM
set proxyHost=
set proxyPort=3128
set JBE_VMArgs_OPTS=-vmargs -DhttpsproxyHost=%proxyHost% -Dhttps.proxyPort=%proxyPort%
REM set JBE_VMArgs_OPTS=
REM
REM Set the JVM to use to the IBM J9 VM otherwise the compilation will fail.
REM
set java_home=C:\Apps\IBM\SDP70\jdk
set classpath=.;%java_home%\lib
set path=%java_home%\bin;%path%
REM
REM Invoke the Jazz Build Engine client.
REM
pushd %JBE_Eclipse_Dir%
jbe.exe -repository %JBE_Repository_URL% -userId %JBE_user -pass %JBE_password% -engineId %JBE_EngineID% -sleeptime 1 %JBE_VMArgs_OPTS%
endlocal
The next step is invoking the command instexnt install to install the service. The only final thing to do is to go inside the Services console of Windows and reconfigure the AutoExNT service to start automatically at boot up. Of course, it needs to be started as well if you want to use the service immediately. 🙂
There are a few more help in the Windos 2003 Resource Kit help but the only thing of interest is using instexnt install /interactive to install the service. This will cause the service to pop out a command window wherein the user can view the console output. The downside is that the user can close the window which will terminate the service.
I have thought about migrating the system to use the Java Service Wrapper but using the AutoExNT separates the service component which allows JBE implementors to replace/delete the JBE installation directory without going through the setup process again.
[edit 20081002] Dom Weinand posted this link in the RTC user forum on how to use the Java Service Launcher to run JBE as a Windows service[/edit]
ciao!
Older Entries Newer Entries
 RSS
RSS